
· 12 min read
How to Send and Receive Email With Amazon SES (and Get Your SMTP Details)
A step-by-step guide to using Amazon SES with your own domain. Verify it, add the DNS records, leave the sandbox, create SMTP details for any app and receive incoming mail into S3.
Jump to section
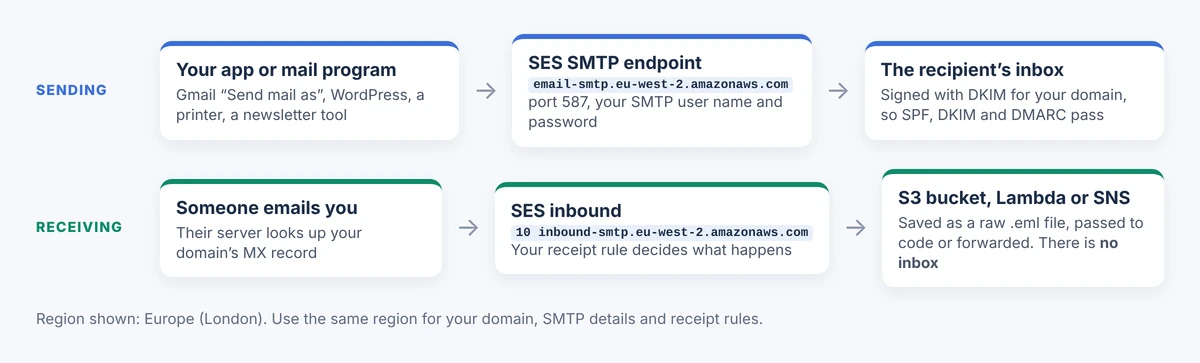
Amazon SES is one of the cheapest ways to send email from your own domain, and it can receive mail too. This guide takes you from a new AWS account to working SMTP details you can paste into any app, plus a rule that catches incoming mail.
I’ve used SES for years to send newsletters and website mail. It’s brilliant at what it does, but it’s a building block, not an email service with an inbox. If you want the bigger picture first, read my Amazon SES review. If you just want it working, start here.
Short answer: in the AWS console, open Amazon SES in one region, then:
- Go to Identities > Create identity > Domain, and add the DKIM and MAIL FROM records it gives you to your DNS.
- Go to SMTP settings > IAM SMTP credentials > Create IAM credentials, and save the user name and password.
- Request production access so you can email anyone, not just verified addresses.
- To receive, point an MX record at
inbound-smtp.region.amazonaws.comand create a receipt rule that saves mail to an S3 bucket.
What You Need Before You Start
Before you start:
- An AWS account with a payment card on it, and sign-in protected by a passkey or security key.
- Access to your domain’s DNS, wherever it’s hosted (Cloudflare, your registrar, Route 53).
- A decision about receiving. If your domain already receives mail at Google Workspace, Microsoft 365 or Fastmail, don’t move its MX record. Receive SES mail on a subdomain instead, such as
in.example.com. More on this below. - Somewhere to read one email during set-up. Gmail and some apps send a code to the address you’re adding.
- About an hour, plus up to a day for AWS to approve production access.
What SES Can and Can’t Do
| SES can | SES can’t |
|---|---|
| Send from any address at your domain over SMTP or an API | Give you an inbox, webmail, IMAP or POP3 |
| Sign your mail with DKIM so it passes SPF, DKIM and DMARC | Let you read mail in Outlook or Apple Mail without extra tools |
| Receive mail and save it to S3, run code on it or bounce it | Filter spam into a junk folder. It only adds spam and virus verdict headers |
| Handle a few emails or millions on the same set-up | Send to strangers until AWS approves production access |
Good to know: AWS says it plainly: SES doesn’t include POP or IMAP servers, so you can’t use a mail app to read incoming mail. If you want a normal inbox with SES-style sending, a common set-up is a mailbox provider (or Cloudflare Email Routing forwarding into Gmail) for receiving, and SES for sending.
What It Costs
| Item | Price | Notes |
|---|---|---|
| Sending, à la carte | $0.10 per 1,000 emails | Plus $0.12 per GB of attachments |
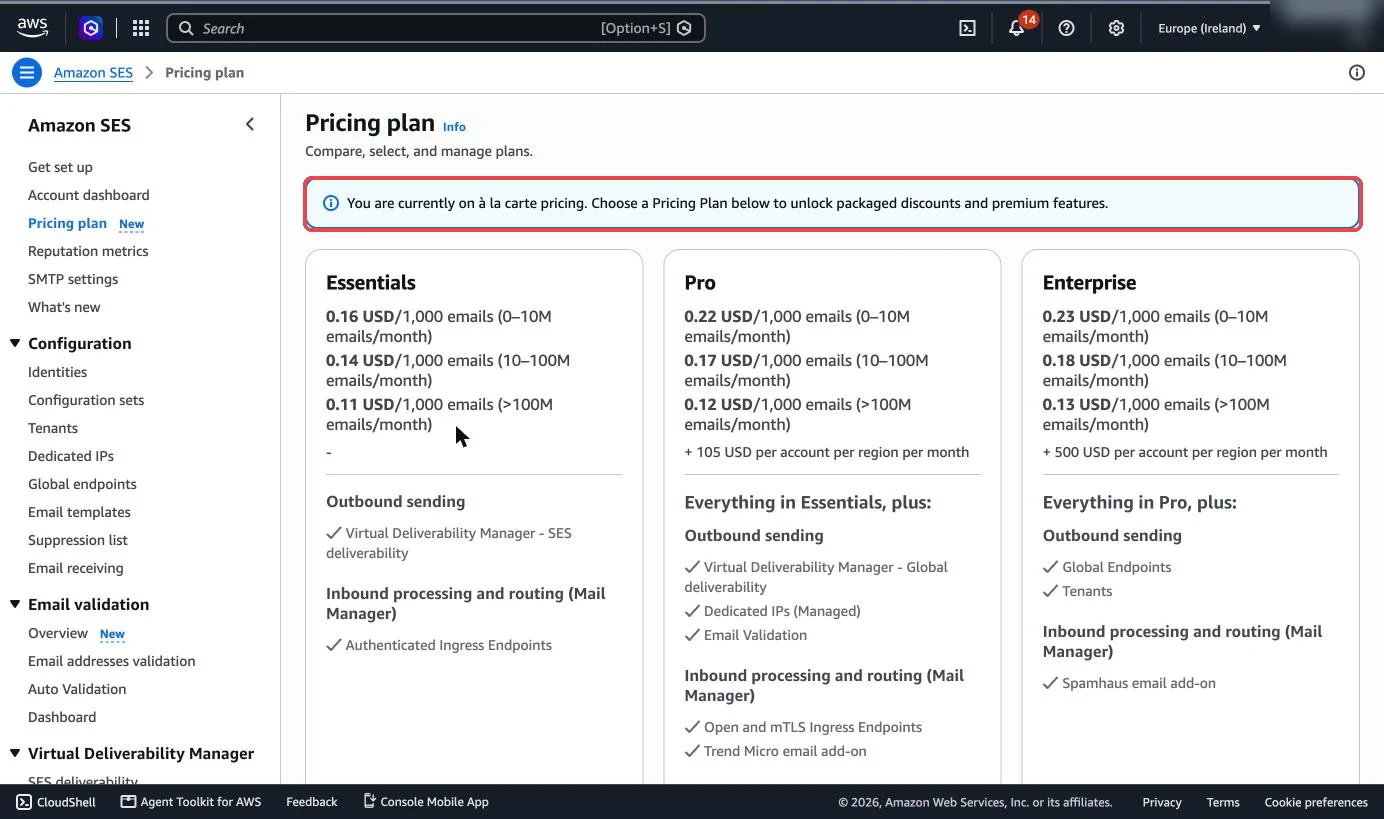
| Sending, Essentials plan | $0.16 per 1,000 emails | New accounts start on this plan. You can switch to à la carte |
| Receiving | $0.10 per 1,000 emails | Plus $0.09 per 1,000 “chunks” of 256 KB |
| S3 storage for received mail | Pennies for most people | Charged by S3, by the amount stored |
Prices as listed on AWS’s SES pricing page on 2 November 2026, in US dollars.
Watch out: AWS says new SES accounts, and regions with no SES use since June 2025, start on the Essentials plan from 21 July 2026. That’s $0.16 per 1,000 rather than $0.10. If you don’t need its extras, switch to à la carte pricing in the SES console.
How to Send Email With Amazon SES
Pick one region and stick to it
Sign in to the AWS console, search for Amazon Simple Email Service and choose a region from the menu at the top right. Your domain, SMTP details, sending limits and receipt rules all belong to that one region.
Pick a region that offers both SMTP and receiving. Europe (Ireland) eu-west-1, Europe (London) eu-west-2, Europe (Frankfurt) eu-central-1, US East (N. Virginia) us-east-1 and US West (Oregon) us-west-2 all do. I use London in the examples below. My screenshots are from Ireland, which looks exactly the same.
Watch out: some regions can send but not receive, and some (such as Milan, Zurich and Bahrain) have no SMTP endpoint at all. Check AWS’s list of SES endpoints before you choose.
Add your domain as an identity
In the SES menu go to Configuration > Identities > Create identity. Choose Domain and type your domain, such as example.com.
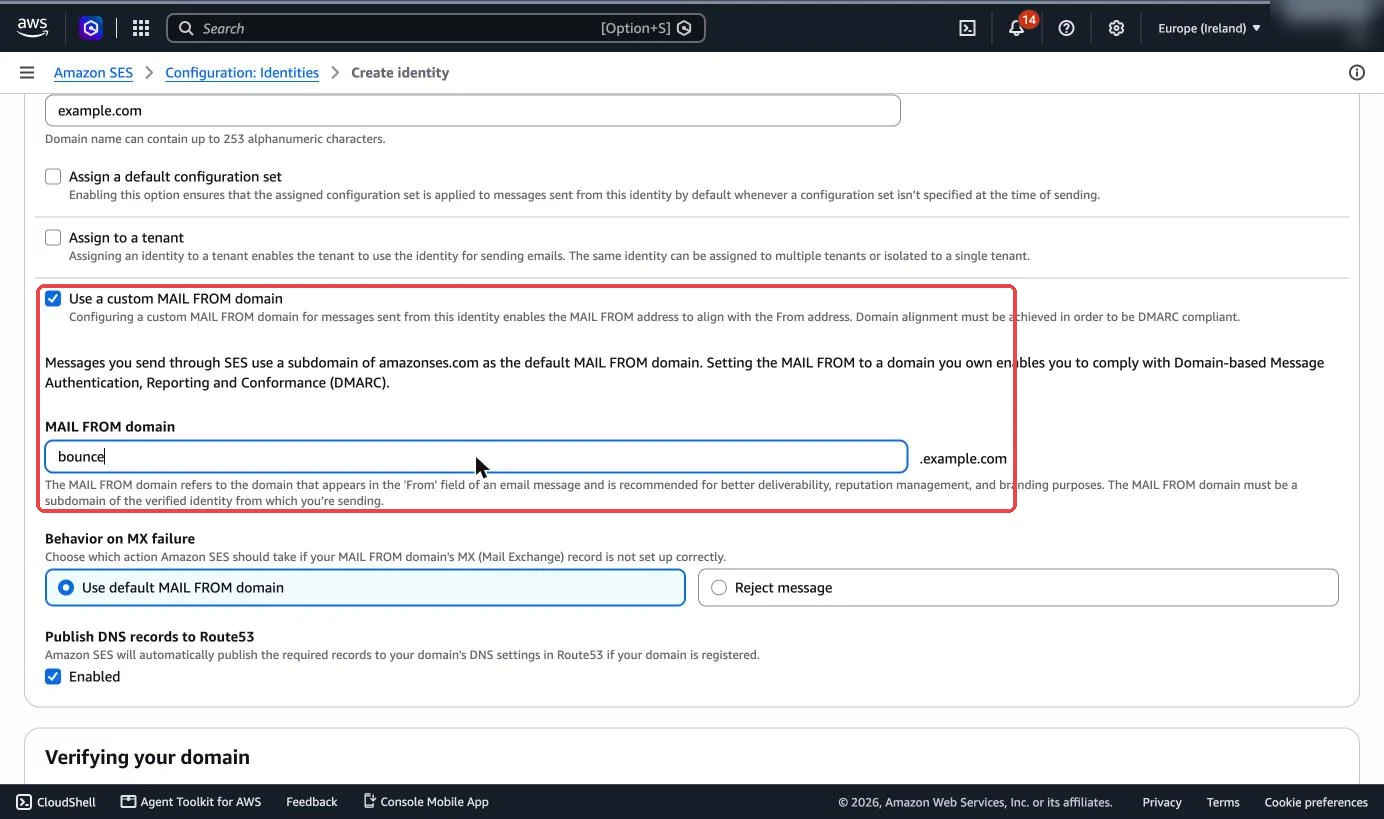
- Under Use a custom MAIL FROM domain, tick the box and enter a subdomain you don’t use for anything else, such as
bounce.example.com. This makes SPF line up with your domain as well as DKIM. - Under Verifying your domain, open Advanced DKIM settings and leave Easy DKIM selected with RSA_2048_BIT keys and DKIM signatures enabled.
- If your DNS is on Route 53, leave Publish DNS records to Route53 ticked and SES adds the records for you.
Select Create identity.
bounce.Add the DNS records SES gives you
Open the new identity and scroll to Publish DNS records. Copy each record into your DNS. You’ll have six:
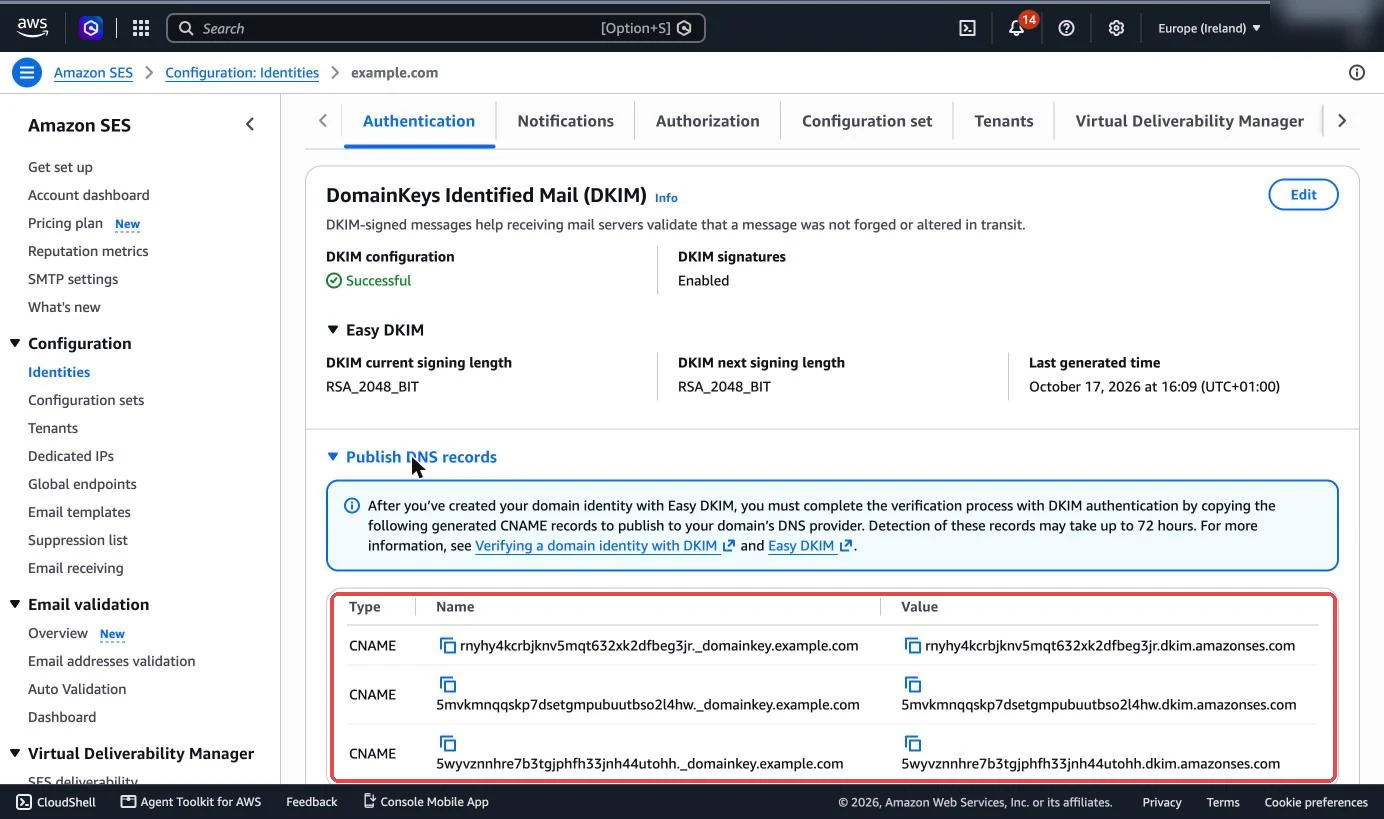
| Record | Type | Name | Value |
|---|---|---|---|
| DKIM (three of these) | CNAME | token._domainkey.example.com | token.dkim.amazonses.com |
| MAIL FROM | MX | bounce.example.com | 10 feedback-smtp.eu-west-2.amazonses.com |
| MAIL FROM SPF | TXT | bounce.example.com | v=spf1 include:amazonses.com ~all |
| DMARC | TXT | _dmarc.example.com | v=DMARC1; p=none; plus a reporting address |
Watch out:
- On Cloudflare, set the DKIM CNAMEs to “DNS only” (grey cloud), not proxied, or they won’t verify.
- Some DNS hosts add your domain to the end automatically. If yours does, enter only
token._domainkeyandbounceas the names. - Keep one DMARC record only. If you already have one, leave it and don’t add another.
If your DNS is on Cloudflare, my guide to setting up Cloudflare’s free DMARC monitoring sorts out the DMARC record and shows you every service sending as your domain, including SES.
Wait for “Verified”
SES checks your DNS on its own. The identity’s status changes from Pending to Verified, usually within minutes, though AWS says spotting the DKIM records can take up to 72 hours. The DKIM and MAIL FROM sections should each say Successful.
Ask to leave the sandbox
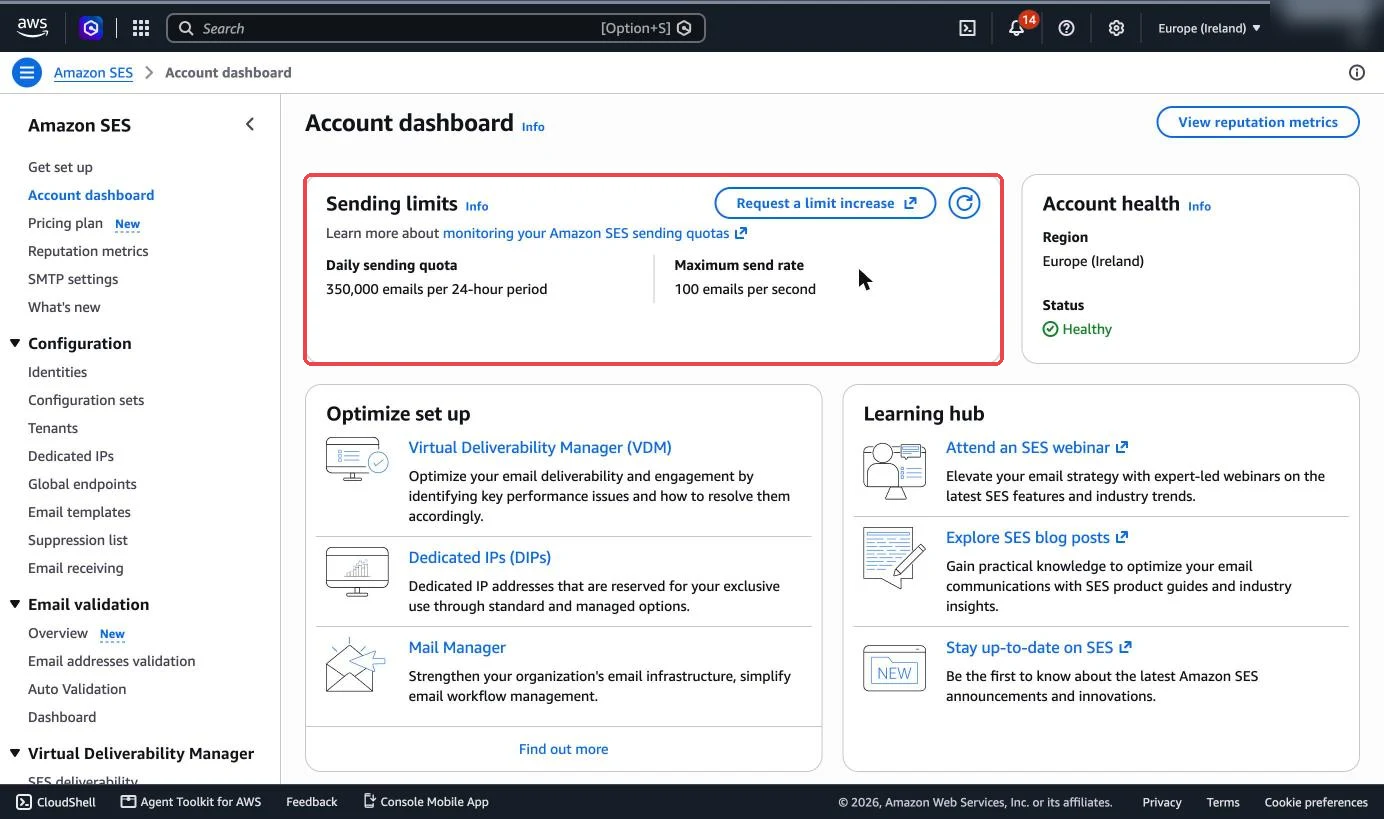
Every new SES account starts in the sandbox, separately in each region. In the sandbox you can only send to addresses and domains you’ve verified, up to 200 emails a day and one a second.
Go to Account dashboard and select Request production access. Choose Transactional or Marketing, add your website and describe in plain words what you’ll send and how people sign up. Confirm that you only email people who asked and that you handle bounces and complaints. AWS says it usually replies within 24 hours.
Good to know: be specific in the request. “Password resets and order receipts for my shop, about 300 a month, only to customers who created an account” gets approved far more readily than “sending emails”. If you’re turned down, you can reply with more detail.
Create your SMTP details
In the SES menu go to SMTP settings. Under Choose credential method you get two options:
- Mail Manager SMTP is marked Recommended, but it runs through Mail Manager, which has its own charges on top. Skip it unless you want Mail Manager’s extras.
- IAM SMTP credentials is the plain, cheap option. Choose this one, then select Create IAM credentials.
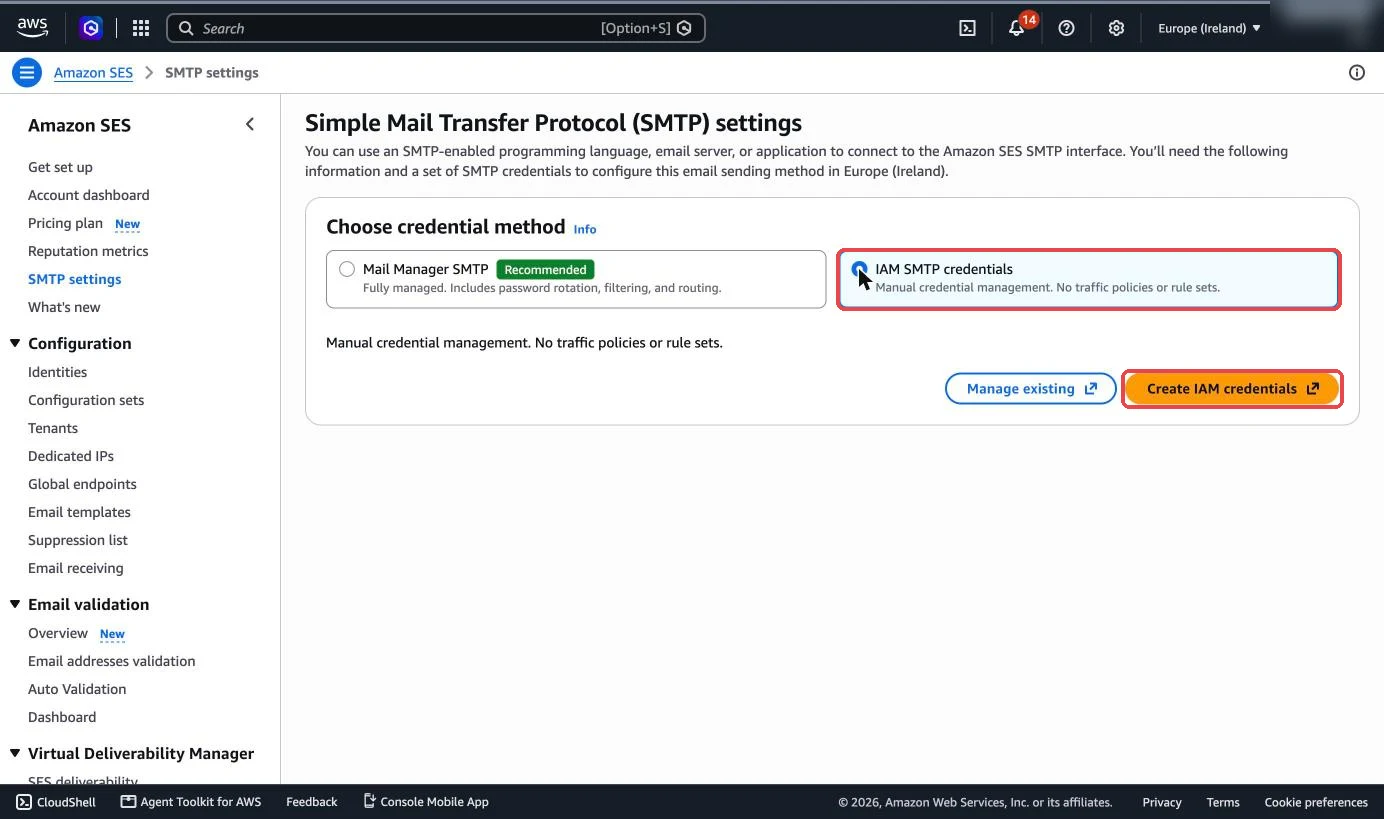
- AWS opens IAM in a new tab and suggests a user name starting
ses-smtp-user.followed by the date. Keep it or type a clearer one, such as the app’s name, then select Create user. - Select Show under SMTP password, then Download .csv file.
Watch out: you see the password once. Close the page without saving it and you’ll need to create a new user. Keep it in your password manager. The SMTP password isn’t your AWS password or secret key, and SMTP details only work in the region you made them in.
Put the SMTP details into your app
Every app asks for the same handful of settings. The server name is email-smtp. followed by your region and .amazonaws.com:
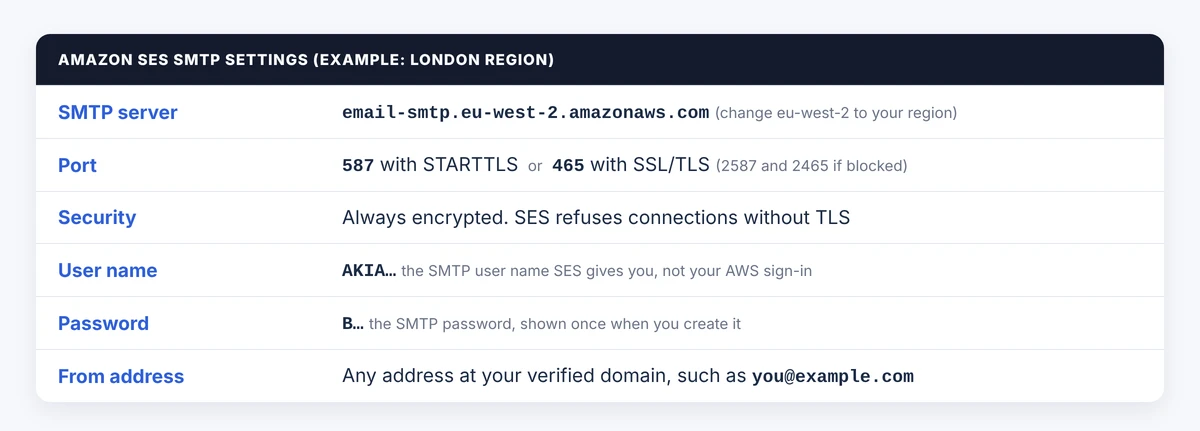
eu-west-2 for your region. Ports 2587 and 2465 help if your network blocks the usual ones.Example: send from your own domain in Gmail. In Gmail on a computer, go to Settings > See all settings > Accounts and Import > Send mail as > Add another email address. Enter your name and you@example.com, then on the next screen enter the SES server, port 587, your SMTP user name and password, and choose Secured connection using TLS. Gmail emails a code to that address, so you’ll need receiving working, or another inbox for that address, to finish.
How to Receive Email With Amazon SES
Point an MX record at SES
Mail finds its way to SES through an MX record. Add this to the domain or subdomain you want SES to receive for:
Type:      MX
Name:      in.example.com     (or example.com if nothing else receives mail there)
Priority:  10
Value:     inbound-smtp.eu-west-2.amazonaws.com
Watch out: a domain’s MX record decides where all its mail goes. If you change the MX on example.com while your mailbox lives at Google or Microsoft, your normal email stops arriving. Use a subdomain for SES unless SES is the only thing receiving mail for that domain.
The domain (or its parent) must already be verified in the same region as the MX record points to.
Create a rule that saves mail to S3
In the SES menu go to Configuration > Email receiving > Create rule set, give it a name, then open it and select Create rule.
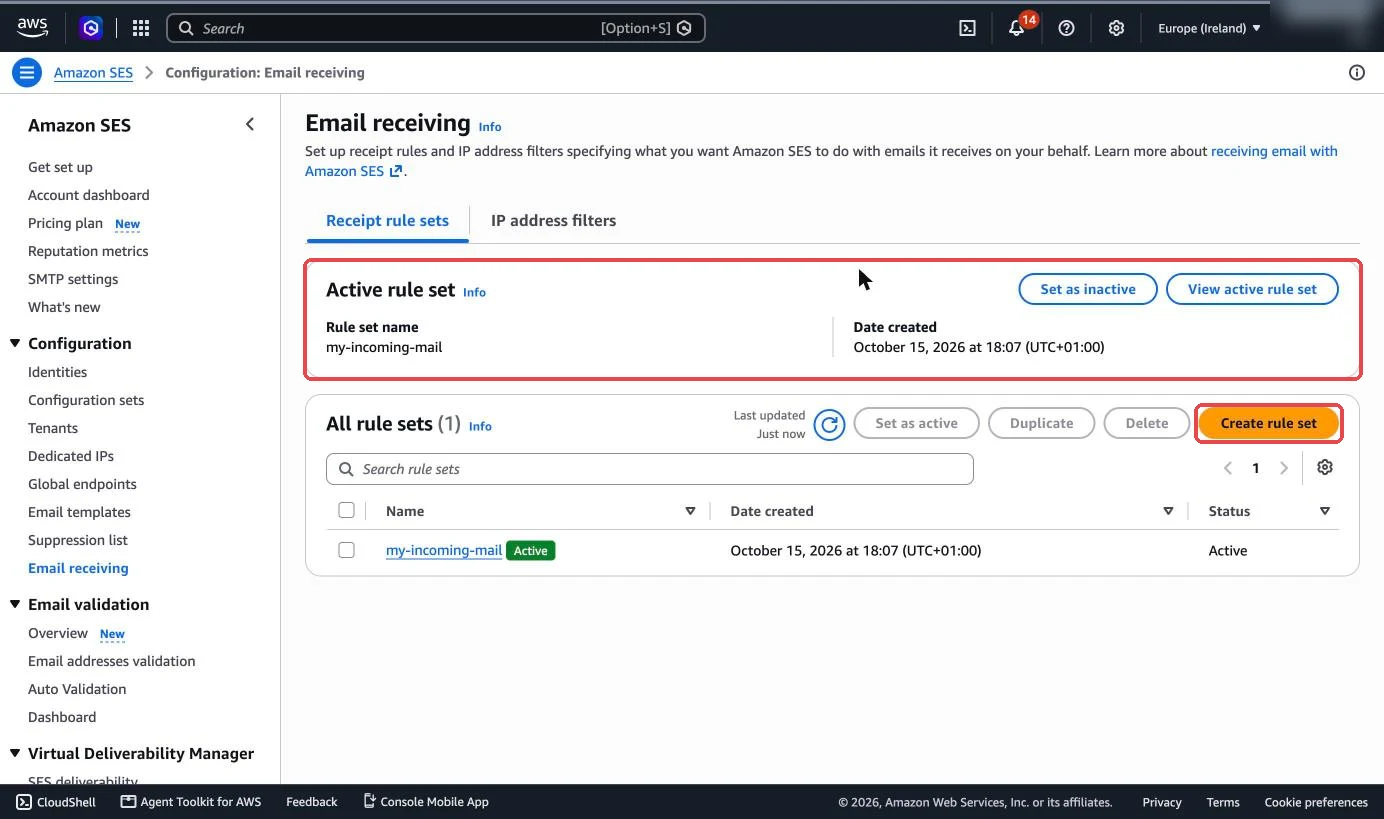
- Rule settings: give it a name and leave Spam and virus scanning ticked.
- Recipient conditions: add the addresses or domain the rule covers, such as
in.example.comorhello@in.example.com. Leave it empty to catch everything for your verified domains. - Actions: choose Deliver to Amazon S3 bucket. Select Create S3 bucket to make one with the right permissions, and optionally set a folder prefix such as
inbox/.
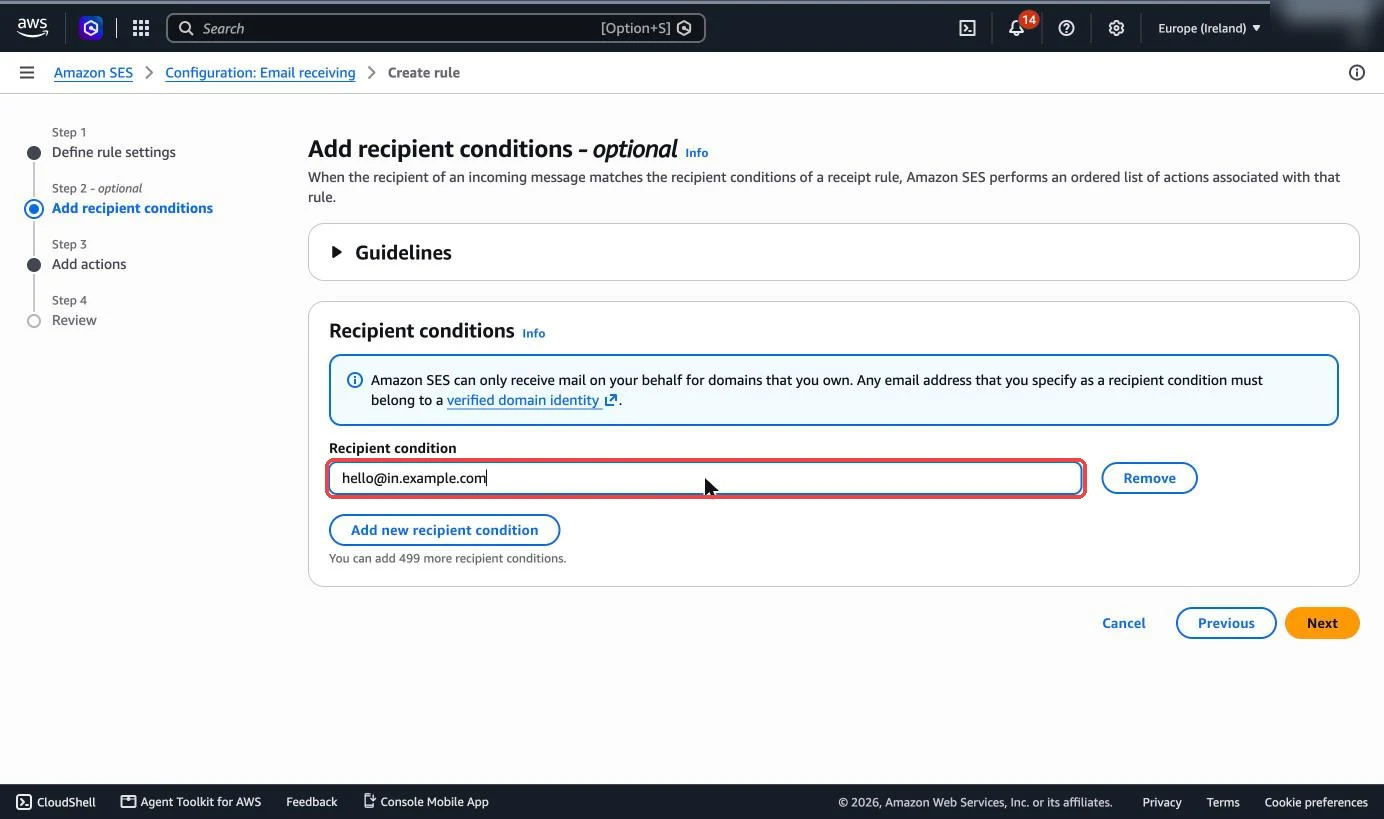
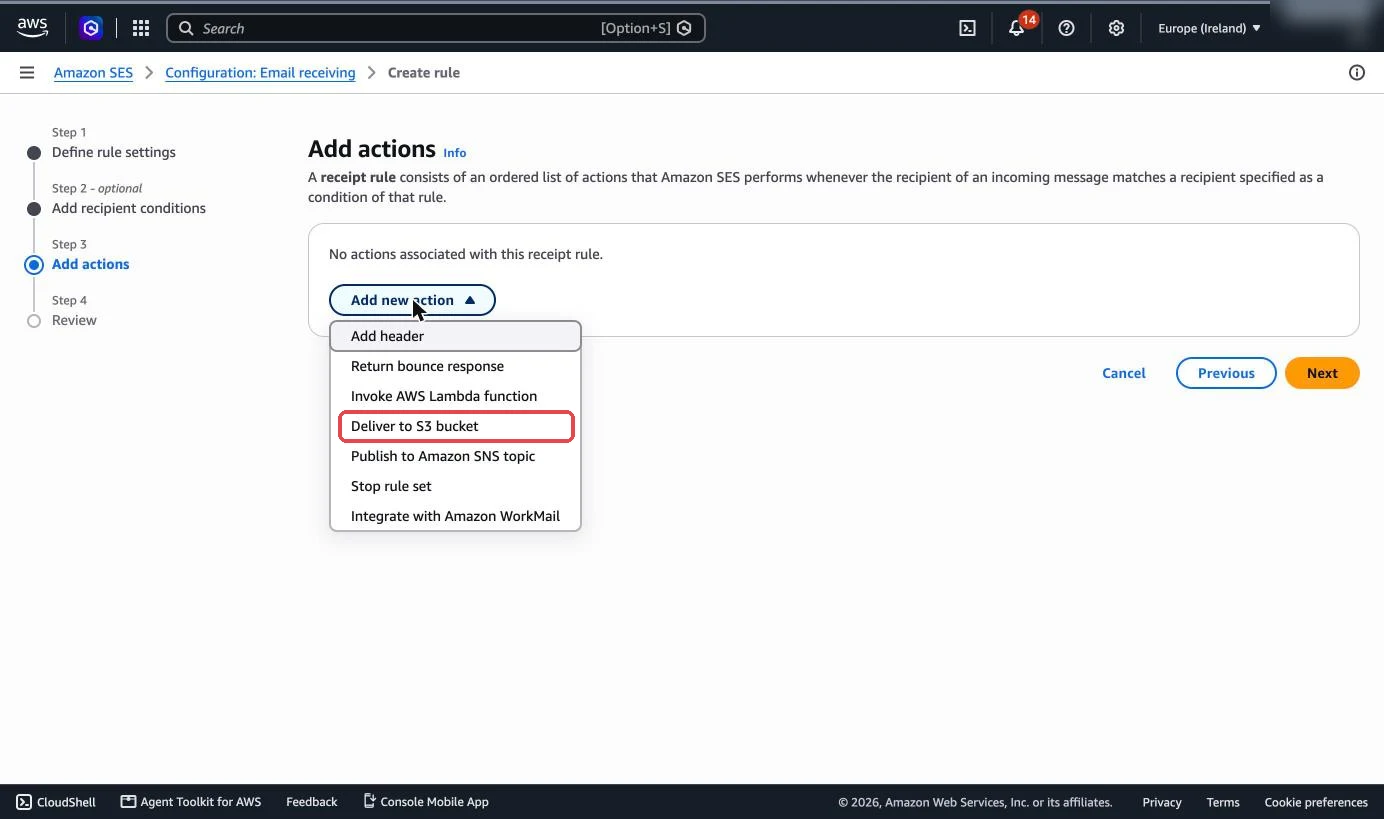
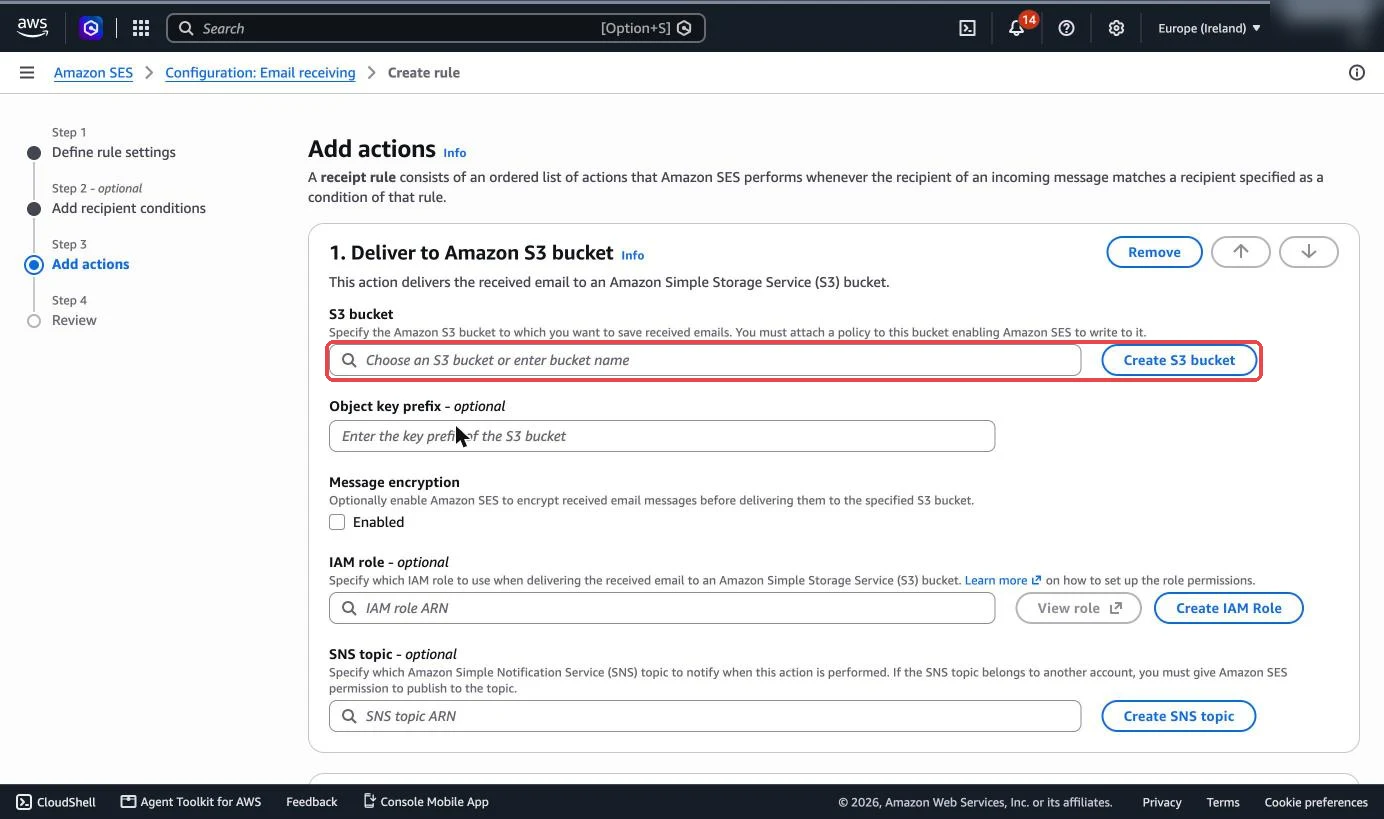
Review and select Create rule. Then, back in the rule set list, make sure your rule set is the Active one. Only one rule set can be active at a time.
Good to know: the other actions are where SES gets clever. Invoke AWS Lambda function runs your code on each message, which is how people build forwarders, ticket systems and AI replies. Return bounce response refuses mail for an address. Publish to Amazon SNS topic sends the message on, but only up to 150 KB, against 40 MB for S3.
Read what arrives
Each email lands in your bucket as one file with a long random name. Open the S3 console, find the bucket, select the newest file and choose Download. Rename it to end in .eml and it opens in Apple Mail, Outlook or Thunderbird as a normal email.
That’s fine for a handful of messages, like the confirmation code from Gmail in step 7. For day-to-day mail, add a Lambda forwarder or receive with a proper mailbox instead.
What to Consider
- It’s infrastructure, not a mail service. No inbox, no spam folder, no support line on the basic plan. You’re the email administrator.
- Look after bounces and complaints. AWS watches your bounce and complaint rates and can pause sending if they climb. Set up notifications under your identity’s Notifications tab, and remove addresses that bounce.
- Treat SMTP details like a password. Anyone with them can send as your domain. Give each app its own SMTP user, so you can delete one without breaking the rest.
- Protect the AWS account itself. Use a passkey or security key on the root user, and set an AWS budget alert so a leaked key can’t quietly run up a bill.
- Everything is per region. Identities, SMTP details, the sandbox and receipt rules. If you change region, you start again.
- Received mail is stored as-is. It isn’t encrypted end to end. You can turn on KMS encryption for the S3 action, and you should set an S3 lifecycle rule to delete old mail you don’t need.
- Blocking spam costs less earlier. Mail refused by an IP address filter isn’t charged. Mail processed by receipt rules is.
How to Test It
1. Send a test from the console. Open your identity and select Send test email. Pick a simulator scenario for a successful delivery, which sends to Amazon’s test address and works even in the sandbox, or Custom to send to an address you’ve verified (in the sandbox) or anyone (in production).
2. Send a test over SMTP. Send from your app or Gmail “Send mail as” to a Gmail address you own. Open it, select the three dots next to Reply, then Show original. You want to see:
SPF:   PASS with IP 54.240.x.x
DKIM:  'PASS' with domain example.com
DMARC: 'PASS'
If DKIM shows amazonses.com rather than your domain, your DKIM records haven’t verified yet.
3. Test receiving. From another account, email an address covered by your rule, such as test@in.example.com. Within a minute a new file should appear in your S3 bucket. If the sender gets a bounce instead, check the MX record, the region and that your rule set is active.
If it didn’t work:
- “535 Authentication Credentials Invalid”: you’ve used your AWS sign-in or access key instead of the SMTP password, or SMTP details from a different region.
- “Email address is not verified”: you’re still in the sandbox, or the From address isn’t at your verified domain.
- The app times out: your network or host blocks port 587 or 465. Try 2587 or 2465.
- Identity stuck on Pending: a DKIM CNAME is proxied on Cloudflare or has your domain on the end twice.
- Nothing arrives in S3: the MX points at a different region, the rule set isn’t active, or the recipient condition doesn’t match.
Alternatives to Amazon SES
| Option | Sends | Receives | Best for |
|---|---|---|---|
| Amazon SES | Yes, SMTP and API | To S3, Lambda or SNS | Websites, apps and newsletters at the lowest cost per email |
| Cloudflare Email Routing | Only with paid Email Sending (beta) | Free forwarding to your existing inbox | Receiving at your own domain without running anything |
| A mailbox provider such as Fastmail | Yes, from a normal inbox | Yes, with apps, IMAP and spam filtering | Your everyday email on your own domain |
| Postmark, Mailgun, Brevo and similar | Yes, with dashboards and templates | Some offer inbound parsing | Teams who want less set-up and more hand-holding |
Just want email on your domain? If what you really want is a proper inbox at your own domain, Fastmail is the service I rate highest. Try it free for up to 30 days, then get 10% off your first year through my link.
Frequently Asked Questions
What are the Amazon SES SMTP settings?
The server is email-smtp.region.amazonaws.com, for example email-smtp.eu-west-2.amazonaws.com for London. Use port 587 with STARTTLS or 465 with SSL/TLS, and the SMTP user name and password you create under SMTP settings in the SES console.
Can I use my AWS password or access key as the SMTP password?
No. SES needs its own SMTP password. Create one under SMTP settings > IAM SMTP credentials > Create IAM credentials.
Can I read SES mail in Outlook or Apple Mail?
Not directly. SES has no IMAP or POP3. You can open saved .eml files, forward mail with a Lambda function, or use a mailbox provider for receiving.
How long does it take to get out of the sandbox?
AWS says it usually responds to production access requests within 24 hours. You need to ask separately for each region you send from.
Is Amazon SES free?
No, but it’s cheap. Sending is $0.10 per 1,000 emails on à la carte pricing, and receiving is $0.10 per 1,000 plus a small charge for large messages. New AWS customers may get Free Tier credits that cover early use.
Can I send as any address at my domain?
Yes. Once the domain is verified, any address at it can be the From address, such as hello@ or invoices@.
The Bottom Line
Sending with SES is well worth the hour it takes. You verify your domain once, create SMTP details, and every app, website and newsletter tool you own can send properly signed mail for a fraction of a penny each. Receiving works too, but it lands in storage rather than an inbox, so it suits automated addresses and developers more than personal mail. For most people, the sweet spot is SES for sending and a real mailbox for reading.
Sources: Amazon SES pricing, SES endpoints and quotas, obtaining SES SMTP credentials, connecting to an SES SMTP endpoint, SES email receiving concepts, publishing an MX record for SES.
Disclosure: This article contains an affiliate link to Fastmail. If you sign up through it, I may earn a commission at no extra cost to you. Checked against AWS’s documentation and pricing on 2 November 2026. AWS changes its console often, so labels may move.

Paul O'Brien
I've spent over 25 years working hands-on with email, DNS and cloud infrastructure. I test email providers and privacy tools for real, then tell you what they're good at and where they fall short.
More about meMore like this
You're subscribed. New articles come by email, as I publish or every Thursday. Change how often
Comments